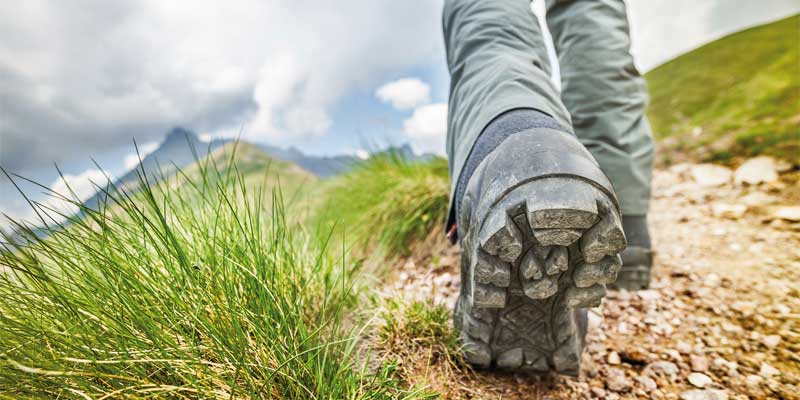
Choosing boots for hiking is one of the most important gear decisions you can make because if you think about it, nothing can ruin a hike faster than not having a good pair of boots. A potential injury may cause with a pair of bad or uncomfortable boots that don’t fit well, your feet are going to slide around and you’re going to risk blisters and even more serious injuries like with your ankles. So it’s critical to choose a good pair of hiking boots that work for you.
The worst advice I have ever heard given to prospective hikers is to choose boots or shoes a half a size too big, saying that your feet will grow into them. This is horrible advice as a blanket statement! Whoever tells you to wear a pair of boots or shoes that are too big can be setting you up with a horrible blister factory guaranteed to torture you horribly!
IT IS A BAD IDEA TO GET BOOTS THAT DO NOT FIT PERFECTLY! The only exception to this is in special conditions when you have a foot-condition that requires it. You better know your feet! In some cases, you need some room to accommodate swelling because the sustained backpacking can and will likely to cause your feet to swell and/or grow far past. In that case, you should at least go for half a size up. You can always wear thicker socks and using duct tape is by far the best thing for blisters.
The trick is to get a boot that gives ample space but does not allow your feet to slide much. See our article on best waterproof boots for hiking and backpacking.
Here’s my advice on how to choose hiking boots or shoes.
1. Understand the type of boots

There’re different types of boots. Starting out with a low top, the Merrell Moab 2 is a good example. It’s just a sneaker height and cuts off right under your ankle. These are good for day-hikes and for ultra-light backpacking when you’re not carrying more than 20 pounds on your back.
Now the middle of the road 80% of boots are mid heights or mid hiking boots. These boots go up around your ankle like Scarpa Zodiac Plus. They’re almost the same weight as your average trail shoes.
For mountaineering, they make boots that go even far above your ankle. These are kind of specialized boots that are not used by a lot of people for just day-hikes. A good example of mountaineering boots is La Sportiva Spantik. These are specially designed for high peaks and technical terrain often with ice tools.
So if you’re doing something beyond a day-hike then you’re going to be looking for a mid-height boot essentially.
2. Choose the right brand
There are different brands of hiking boots. Some work better for wider feet and other for narrower feet. For a wider foot, I’d recommend going with Merrell. They make these boots with a lot of volumes so for people with wider feet; these boots may be really comfortable. Keen is another brand for people with wider feet. They also make bigger volume, more padded and comfortable boots.
On the narrower end, I’d look at Vasque, because they come with narrow or almost aggressive kind of foot fitting. There is not a lot of volume in these boots which is why people with narrower feet find these to be really comfortable. More on narrower boots are Salomon, aggressively designed, lightweight and low volume boots.
3. Consider waterproof/Gore-Tex boots

On a trail like Appalachian Trail or when you’re hiking on the East Coast, it rains a lot. Must your feet get wet? Probably so, and you still need to step through in damped and wet surfaces ending up your boot filled with tons of water. It may be inevitable at times and you better get off with a pair of waterproof boots or boots with Gore-Tex that dries quickly.
4. Learn how to get boots that fit
Knowing how the boots fit is essential. The first element of fit is an overall comfort to check the comfort, first completely unlace the boot and fold the tongue back, then try it on with the socks you’re going to use when you hike. Secondly, slide your foot into the boot and lace it up snug, have a test walk, does the boot feel comfortable on your feet? Are there any uncomfortable seams? Is it too tight in any areas or too loose in others? With the boot on, you should be able to slide two fingers into the back, pretty snug and there shouldn’t be extra movement.
As you walk around and should your feet go from heel to toe, it is definitely loose on you. Furthermore, think about the heel movement in the boot. Are you getting any heel lift? Is your heel lifting out of the back of the boot? It’s okay to have about a quarter of an inch of lifting its just about enough slack you want some movement there otherwise the boot may be too tight.
5. Arch support
You’re also going to look at arch support. As far as arch support, it isn’t quite critical to look at but it’s a massive plus for boots to have plenty of arch support so when you get in it, you already feel comfortable and supported, you feel like you can hike all day in these boots and not having aches and pains.
6. Consider a boot that you’ve used before
I recommend that you choose footwear that you have used in the past with good experience. Boot sizes are not universal so different brands that are of the same size may fit differently.
7. Get your boots when you take your day off
Feet normally swell a bit during the day’s activities and are at their largest size late during the day. So it is a wise choice to buy any boots for hiking as you take your day off when your feet are swollen to their largest size so you get the best possible fit. This helps you avoid buying boots that may get too tighter and becoming uncomfortable during a hike.
8. Spend some time in the boots
If possible get to an outfitter with an incline-surface and wear your pick, walk around with them to get a good feeling about whether your footwear will be bearable on actual trail conditions. If not, buy from a place where you can return them if they don’t work out.
9. Hiking boots are durable
Hiking boots are designed to be durable and supportive. Don’t be surprised if it feels stiff underfoot or it doesn’t feel as flexible as you expect them to. It’s not at all going to be like a regular sneaker or running shoe. You may feel stiffness. A boot which is one solid piece of leather is definitely going to be a break in period. You may need to wear the boot for several weeks, even months if you buy a stiff enough boot before that will break in.
A boot which is a fabric and leather construction gives more flexibility and it’s easier for the boot to break in. These boots probably have very little to no break-in times, maybe from a few days to none at all.
10. Try both men’s and women’s version
Try both men’s and women’s footwear as you often cannot tell any difference visually and you may find a better fit.
11. Bring your insoles

Bring your insoles and wear whatever socks you’ll be wearing on the trail to try on your footwear with them.
There are gel insoles like Sof Sole or Dr. Scholes gel arch support insoles. These will absorb the impact instead of your back, knees, and feet.
These gel insoles are made for people who spend most of their time on feet at work, not really made for strenuous activities like hiking. If you use these on a long hiking trail like Appalachian Trail, they’ll get shredded to pieces pretty fast.
There are companies that sell stiff orthotics specifically designed for activities like hiking.
12. Understand midsoles

The midsole is the area between the insole and the outsole. The insole is what your feet rest upon, and the outsole is the piece of boot that touches the ground. There’re two types of midsoles i.e. EVA foam and polyurethane.
EVA foam is a lightweight, more flexible, less expensive and often little bit less durable.
Polyurethane is more durable, denser material and when you have a midsole made of polyurethane the outsole is more supportive. However, it’s at the expense of more money and they’re quite a bit heavier. So in relation to the debate which one is better, well there really isn’t an answer to that question, that’ll be up to you to decide.
13. Take the outsole seriously

The outsole is the piece of boot that touches the ground. Hard soles increase the durability of boots but make boots heavier. Look for an outsole that provides traction and support. Don’t buy thin-sole shoes if you’re trekking through the Rockies with a heavy pack.
14. Leave space at the end of your toes
Leave a finger worth of space at the end of your toes for when you are going downhill. This prevents your toes from smashing into the end of your footwear and causing infection and toenail loss.
15. Boots versus shoes
In cold weathers, rugged, rocky and broken terrain, boots provide good ankle support and thick soles for shock protection and to guard against pointy rocks. They often have good insulation which helps in cold weather. You can get lightweight breathable boots with Gore-Tex that can dry quickly when they get wet.
Shoes are lighter and are good for warmer temperatures as they are made of thinner materials. They are good for well maintained and flat trails as they often have thin soles that don’t offer much in the way of impact protection. The lightweight and breathable materials have the benefit of drying very quickly as well.
16. Consider the temperature and terrain
Pick your footwear that best suits the temperatures and terrain you may encounter on your hike.
17. Know lacing techniques

Use lacing techniques to make the boots fit a little bit better and hold your feet in place. Because everybody has different shapes and volumes in their feet, no single lacing technique is going to work for everyone. If you’ve lower volume feet or a low arch, you may be able to use techniques that put pressure and tension over the top of the feet. If you’ve high arch or very high volume feet it may not work for you and may put a little extra pressure and restrict circulation. In these situations, there may be other techniques that you can use to work around it. Therefore, using lacing techniques to ensure your feet don’t move unnecessarily in your boot during activity.
18. Read reviews
Read the customer reviews on the footwear of your choice before buying to check the experiences of other people with the product, you may easily decide to avoid products with poor customer reviews and ratings. A little research will surely benefit you for your time and money.
19. Price
Obviously, you’re going to try to get a good product at an affordable price. I wouldn’t say there isn’t anything you shouldn’t skimp on, but don’t skimp on boots, because the damage caused by the low-quality boots can be too costly in the end. So that’s something to consider.
20. Break it in
You found a boot that worked great for you, now you need to let it break it in, and what that means is, just wear it around, let the sole break down a little bit and let them get fit on your feet to make sure it really is the right boot for your upcoming hike.
Here you go, these are some crucial suggestions for you to consider before choosing boots for hiking. I hope these points will be helpful in selecting a good pair of boots to give you happy feet!
Have I forgotten anything? Remember that these are general guidelines and also solely my own opinion what works for me. There are a lot of different types of hiking boots and shoes that a lot of people use. It’s totally a preference thing, use what works best for you.
Thanks for taking the time to read and consider this.

